Setup for Jolokia and Hawtio/Artemis Console
This content is for the 3.3.6 version. Switch to the latest version for up-to-date documentation.
Background
Standalone Artemis MQ server comes with web server and Artemis Console that enables monitoring and operations directly on the server. However, when Artemis is embedded in a Java application, the console is not available. The following steps allow to re-enable and attach external HawtIO or Artemis Console to JMS Bridge.
As Artemis Console is a set of plugins built on top of HawtIO - steps to connect / enable it are same - additional steps to build the console are described further down.
Jolokia
Jolokia is a JMX-HTTP bridge giving an alternative to JSR-160 connectors.
Among other installation methods - Java agent based installation is supported - required startup flags are already included in JMS Bridge startup script.
Installation
Download agent
Download latest version of Jolokia agent
from Jolokia Maven page and place it in the JMS Bridge
jars directory JMS_BRIDGE_ROOT/share/java/jms-bridge/.
Set Jolokia related Env variables
Before starting JMS Bridge - set Environment variables for Jolokia Port and Host JOLOKIA_PORT and JOLOKIA_HOST -
both Env variables have to be set for Agent to be enabled.
JOLOKIA_HOST has to be set to the host resolvable from HawtOI / Artemis Console - i.e. it cannot be set to localhost
if connecting from remote machine using jms-bridge-vm1 hostname.
HawtIO
HawtIO is a modular web console for managing Java applications. It is built on top of Jolokia and provides a set of plugins for managing Java applications. HawtIO get started guide
If using vanilla HawtIO - it can be ran as a WAR application within a web server, standalone as a JAR etc, it can be deployed and ran alongside JMS Bridge on the JMS Bridge host or deployed and ran on separate host / local laptop etc.
Installation - Standalone Jar
Download latest version of standalone Jar from HawtIO sonatype page
run using java -Dhawtio.proxyAllowlist=JMS_BRIDGE_HOST_VM1,JMS_BRIDGE_HOST_VM2 -jar hawtio-app-2.17.7.jar
or to run it in background process - use:
nohup java -Dhawtio.proxyAllowlist=JMS_BRIDGE_HOST_VM1,JMS_BRIDGE_HOST_VM2 -jar hawtio-app-2.17.7.jar 2>&1 < /dev/null > hawtio.log &
Note - replace JMS_BRIDGE_HOST_VM1,JMS_BRIDGE_HOST_VM2 with actual hostnames of JMS Bridge VMs that it’s connecting to.
Artemis Console
Artemis Console is a set of plugins built on top of HawtIO - it can be built and ran standalone or as a WAR application within a web server.
Installation - Standalone WAR running through embedded jetty maven plugin
Download Artemis Console WAR from Artemis Console Maven page
put following pom.xml in the same folder with the WAR file:
<?xml version="1.0" encoding="UTF-8"?><!--  Licensed to the Apache Software Foundation (ASF) under one or more  contributor license agreements.  See the NOTICE file distributed with  this work for additional information regarding copyright ownership.  The ASF licenses this file to You under the Apache License, Version 2.0  (the "License"); you may not use this file except in compliance with  the License.  You may obtain a copy of the License at
  http://www.apache.org/licenses/LICENSE-2.0
  Unless required by applicable law or agreed to in writing, software  distributed under the License is distributed on an "AS IS" BASIS,  WITHOUT WARRANTIES OR CONDITIONS OF ANY KIND, either express or implied.  See the License for the specific language governing permissions and  limitations under the License.--><project xmlns="http://maven.apache.org/POM/4.0.0" xmlns:xsi="http://www.w3.org/2001/XMLSchema-instance"         xsi:schemaLocation="http://maven.apache.org/POM/4.0.0 http://maven.apache.org/maven-v4_0_0.xsd">    <modelVersion>4.0.0</modelVersion>
    <groupId>org.apache.activemq</groupId>    <artifactId>artemis-console-war</artifactId>    <version>2.36.0</version>    <packaging>war</packaging>    <name>ActiveMQ Artemis Console War</name>
    <dependencies>    </dependencies>
    <build>        <plugins>            <plugin>                <groupId>org.eclipse.jetty</groupId>                <artifactId>jetty-maven-plugin</artifactId>                <version>10.0.22</version>                <configuration>                    <deployMode>EMBED</deployMode>                    <scan>10</scan>                    <contextHandlers>                        <contextHandler implementation="org.eclipse.jetty.maven.plugin.MavenWebAppContext">                            <war>artemis-console-2.36.0.war</war>                            <contextPath>/console</contextPath>                        </contextHandler>                    </contextHandlers>                    <modules>                        <module>jmx</module>                    </modules>                    <systemProperties>                        <hawtio.authenticationEnabled>false</hawtio.authenticationEnabled>                        <hawtio.disableProxy>false</hawtio.disableProxy>                        <hawtio.proxyAllowlist>JMS_BRIDGE_VM1,JMS_BRIDGE_VM2</hawtio.proxyAllowlist>                    </systemProperties>                </configuration>            </plugin>        </plugins>    </build></project>
Making sure to update the <war>artemis-console-2.36.0.war</war> to correct filename (if versions differ) and
<hawtio.proxyAllowlist>JMS_BRIDGE_VM1,JMS_BRIDGE_VM2</hawtio.proxyAllowlist> to actual JMS Bridge VM hostnames -
generally those will match JOLOKIA_HOST env vars set on those VMs.
Then run mvn jetty:run from the same directory as the WAR file and pom.xml - this will start embedded Jetty server and
deploy the WAR file.
Navigate to http://host:8080/console to open the Artemis Console - for example if running on local machine - that will
be http://localhost:8080/console
Connect Hawtio / Artemis Console to the Jolokia endpoints on the JMS Bridge VMs
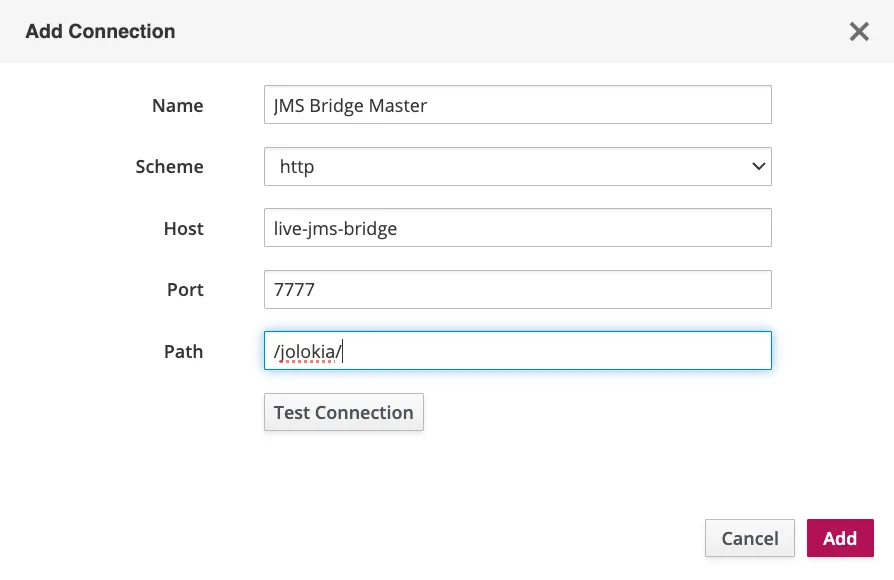
On the HawtIO / Artemis Console landing page - click Add Connection and fill in as follows:
- Name: JMS Bridge VM1 (or Master etc)
- Scheme: HTTP
- Host: JMS_BRIDGE_VM1 (actual host)
- Port: JOLOKIA_PORT (actual port)
- Path: /jolokia/
Test Connection to verify.
Click Add to save.
Example for JMS Bridge Master deployed on live-jms-bridge host and JOLOKIA Port of 7777
Once connection is saved - click on the Connect button to open the JMS Bridge monitoring page.